OpenIMAJ contains a set of classes that contain implementations of
some of the state-of-the-art face detection and recognition
algorithms. These classes are provided as a sub-project of the
OpenIMAJ code-base called faces. The OpenIMAJ
maven archetype adds the face library as a dependency and so we can
start building face detection applications straight away.
Create a new application using the quick-start archetype (see
tutorial 1) and import it into your IDE. If you look at the
pom.xml file you will see that the
faces dependency from OpenIMAJ is already
included. As you’ve already done the video-processing tutorial,
we’ll try to find faces within the video that your cam produces.
If you don’t have a cam, follow the video tutorial on how to use
video from a file instead.
Start by removing the code from the main method of the
App.java class file. Then create a video capture
object and a display to show the video. Create a listener on the
video display to which we can hook our face finder. The code is
below, but check out the previous tutorial on video processing if
you’re not sure what it means.
VideoCapture vc = new VideoCapture( 320, 240 );
VideoDisplay<MBFImage> vd = VideoDisplay.createVideoDisplay( vc );
vd.addVideoListener(
  new VideoDisplayListener<MBFImage>() {
    public void beforeUpdate( MBFImage frame ) {
    }

    public void afterUpdate( VideoDisplay<MBFImage> display ) {
    }
  });
For finding faces in images (or in this case video frames) we use a
face detector. The FaceDetector interface
provides the API for face detectors and there are currently two
implementations within OpenIMAJ - the
HaarCascadeDetector and the
SandeepFaceDetector. The
HaarCascadeDetector is considerably more robust
than the SandeepFaceDetector, so we’ll use that.
In the beforeUpdate() method, instantiate a new
HaarCascadeDetector. The constructor takes the
minimum size in pixels that a face can be detected at. For now, set
this to 40 pixels:
FaceDetector<DetectedFace,FImage> fd = new HaarCascadeDetector(40);
Like all FaceDetector implementations, the
HaarCascadeDetector has a method
detectFaces() which takes an image. Because the
HaarCascadeDetector uses single band images, we
must convert our multi-band colour image into a single band image.
To do this we can use the Transforms utility
class that contains some static methods for converting images. The
calculateIntensity() method will do just fine.
Note that functionally the calculateIntensity()
method does the same thing as the flatten()
method we used earlier when used on RGB images.
List<DetectedFace> faces = fd.detectFaces(Transforms.calculateIntensity(frame));
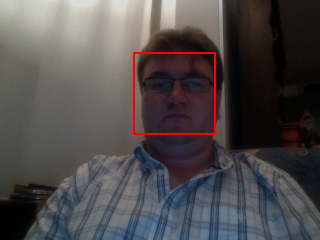
The detectFaces() method returns a list of
DetectedFace objects which contain information
about the faces in the image. From these objects we can get the
rectangular bounding boxes of each face and draw them back into our
video frame. As we’re doing all this in our
beforeUpdate() method, the video display will end
up showing the bounding boxes on the displayed video. If you run the
code and you have a cam attached, you should see yourself with a
box drawn around your face. The complete code is shown below:
FaceDetector<DetectedFace,FImage> fd = new HaarCascadeDetector(40);
List<DetectedFace> faces = fd.detectFaces( Transforms.calculateIntensity(frame));

for( DetectedFace face : faces ) {
    frame.drawShape(face.getBounds(), RGBColour.RED);
}
OpenIMAJ has other face detectors which go a bit further than just
finding the face. The FKEFaceDetector finds
facial keypoints (the corners of the eyes, nose and mouth) and we
can use this detector instead simply by instantiating that object
instead of the HaarCascadeDetector. The
FKEFaceDetector returns a slightly different
object for each detected face, called a
KEDetectedFace. The
KEDetectedFace object contains the extra
information about where the keypoints in the face are located. The
lines of our code to instantiate the detector and detect faces can
now be changed to the following:
FaceDetector<KEDetectedFace,FImage> fd = new FKEFaceDetector();
List<KEDetectedFace> faces = fd.detectFaces( Transforms.calculateIntensity( frame ) );
If you run the demo now, you will see exactly the same as before, as
the FKEFaceDetector still detects bounding boxes.
It may be running a bit slower though, as there is much more
processing going on - we’re just not seeing the output of it! So,
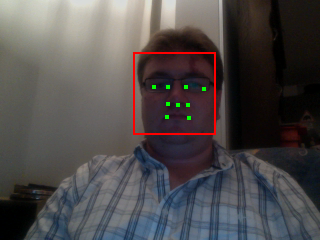
let’s plot the facial keypoints.
To get the keypoints use getKeypoints() on the
detected face. Each keypoint has a position (public field) which is
relative to the face, so we’ll need to translate the point to the
position of the face within the video frame before we plot the
points. To do that we can use the translate()
method of the Point2d class and the
minX() and minY() methods of
the Rectangle class.
8.1.1. Exercise 1: Drawing facial keypoints
Use the information above to plot the facial keypoints on the
video.
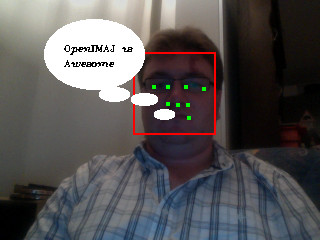
8.1.2. Exercise 2: Speech bubbles
Try and take the speech bubble from the previous image tutorial
and make it come from the mouth in the video.
Hints: use
getKeypoint(FacialKeypointType) to get the
keypoint of the left corner of the mouth and plot the ellipses
depending on that point. You may need to use smaller ellipses
and text if your video is running at 320x240.