Chapter 7. Processing video
In this section we’ll show you how to deal with videos using
OpenIMAJ. We provide a set of tools for loading, displaying and
processing various kinds of video.
All videos in OpenIMAJ are subtypes of the Video
class. This class is typed on the type of underlying frame. In this
case, let’s create a video which holds coloured frames:
Video<MBFImage> video;
Exactly what kind of video is loaded depends on what you want to do.
To load a video from a file we use the
Xuggle library which internally
uses ffmpeg. Let’s load a video from a file
(which you can download from here:
http://static.openimaj.org/media/tutorial/keyboardcat.flv).
If we want to load a video from a file we use a XuggleVideo object:
video = new XuggleVideo(new File("/path/to/keyboardcat.flv"));
![[Tip]](images/tip.png) |
Tip |
The XuggleVideo class also has constructors that let you pass a URL to a video on the web without downloading it first:
video = new XuggleVideo(new URL("http://static.openimaj.org/media/tutorial/keyboardcat.flv"));
|
If your computer has a camera, OpenIMAJ also supports live video
input. These are called capture devices and you can use one through
the VideoCapture class:
video = new VideoCapture(320, 240);
This will find the first video capture device attached to your
system and render it as closely to 320 × 240 pixels as it can. To
select a specific device you can use the alternative constructors
and use the VideoCapture.getVideoDevices() static
method to obtain the available devices.
To see if either of these kinds of video work, we can use
VideoDisplay to display videos. This is achieved
using the static function calls in VideoDisplay
(which mirror those found in DisplayUtilities for
images) like so:
VideoDisplay<MBFImage> display = VideoDisplay.createVideoDisplay(video);
Simply by creating a display, the video starts and plays. You can
test this by running your app.
As with images, displaying them is nice but what we really want to
do is process the frames of the video in some way. This can be
achieved in various ways; firstly videos are
Iterable, so you can do something like this to
iterate through every frame and process it:
for (MBFImage mbfImage : video) {
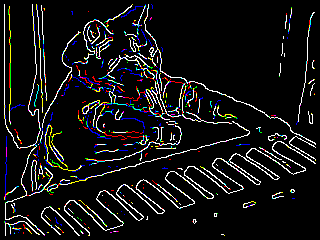
DisplayUtilities.displayName(mbfImage.process(new CannyEdgeDetector()), "videoFrames");
}
Here we’re applying a Canny edge detector to each frame and
displaying the frame in a named window. Another approach, which ties
processing to image display automatically, is to use an event driven
technique:
VideoDisplay<MBFImage> display = VideoDisplay.createVideoDisplay(video);
display.addVideoListener(
  new VideoDisplayListener<MBFImage>() {
    public void beforeUpdate(MBFImage frame) {
        frame.processInplace(new CannyEdgeDetector());
    }

    public void afterUpdate(VideoDisplay<MBFImage> display) {
    }
  });
These VideoDisplayListeners are given video
frames before they are rendered and they are handed the video
display after the render has occurred. The benefit of this approach
is that functionality such as looping, pausing and stopping the
video is given to you for free by the
VideoDisplay class.
7.1.1. Exercise 1: Applying different types of image processing to
the video
Try a different processing operation and see how it affects the
frames of your video.